In JavaScript, we use functions in three different ways:
- as methods of objects;
- as constructors of objects;
- and, as “regular” functions (that is, functions we typically write either as top-level functions, or functions we pass as anonymous functions to other functions).
I looked at the third use case for functions in my previous post, where I wrote about arrow functions.
Now, it’s time to take a look at the second of these use cases for functions: that is, as constructors of objects.
Functions that are used to construct objects are just like regular JavaScript functions, but we call them with the new operator, and it’s this new operator that makes them behave a bit differently from a normal function call. Let’s step through an example (and if you need a refresher on object construction, check out Chapters 12 and 13 in Head First JavaScript Programming.
Here’s a function we can use to construct Dog objects:
function Dog(name, breed, weight) {
    this.name = name;
    this.breed = breed;
    this.weight = weight;
    this.bark = function()
        console.log(this.name + " says woof woof!");
    };
}
To construct new objects using this function, we call the function with new, like this:
var fido = new Dog("Fido", "Mixed", 24);
Then we can access the Dog’s properties like this:
fido.name; // returns "Fido"
fido.bark(); // displays "Fido says woof woof!" in the console
If we want to put the bark method in the prototype object, we can do that like this:
Dog.prototype.bark = function bark() {
    console.log(this.name + " says woof woof!");
};
and remove the bark method from the Dog constructor function:
function Dog(name, breed, weight) {
    this.name = name;
    this.breed = breed;
    this.weight = weight;
}
Moving bark to the prototype object means that all new instances of Dog inherit the bark method but it’s only defined once (in the prototype object) and shared across all the instances (a bit more efficient).
We can also add methods to the function object, Dog. We didn’t talk about this in Head First JavaScript Programming, so if you’re not familiar with this already, don’t worry; this is just a way to define functions associated with Dogs, but that aren’t related to specific Dog instances. Here’s how you do that:
Dog.describe = function describe() {
   console.log("All dogs are canines");
};
You call describe like this:
Dog.describe();
Just remember that describe has nothing to do with Dog instances (like fido); it’s a method of the Dog constructor function.
So, Dog is our constructor function that we call with new to create new Dog objects; bark is a prototype method that’s inherited by all Dog instances, and describe is a function associated with the Dog constructor function (we often call this a “static” method).
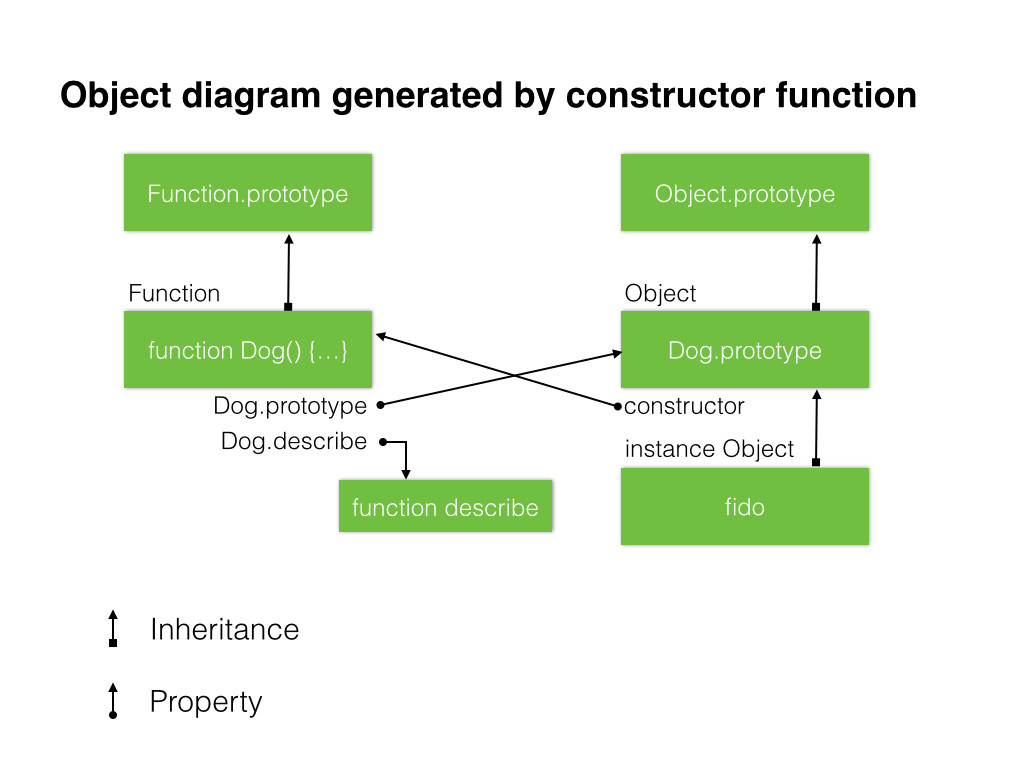
Here’s the object diagram that’s created by this code:
On the left side of the diagram, we’ve got the constructor function, Dog, a function object which inherits from the Function.prototype object, and has its own method, describe. On the right side of the diagram, we’ve got fido, the object we create when we call
var fido = new Dog("Fido", "Mixed", 24);
fido inherits the method bark from the Dog.prototype object, which in turn inherits methods like toString and hasOwnProperty (check out Chapter 13 in Head First JavaScript Programming for a refresher).
CLASS
In JavaScript ES6, we have a whole new way to write constructors, add methods to prototype objects, and define static methods. The key is the new class keyword in JavaScript. Now, before you get all excited, no, this doesn’t mean that JavaScript now has “classes” in the sense you might be used to if you’ve used Java or C# or another object-oriented language with “classical” inheritance. JavaScript is still a language with prototypal inheritance—that has not changed! The use of the keyword class to define constructors may be a bit confusing for those who are expecting traditional classes, but for those of you well-versed in prototypal inheritance, rest assured, that’s still the inheritance model in JavaScript.
Okay, now that we’ve got that out of the way, let’s see how you can use class—plus a couple of other new keywords—to define constructors. We’ll rewrite our Dog constructor using the new syntax for JavaScript ES6:
class Dog {
    constructor(name, breed, weight) {
        this.name = name;
        this.breed = breed;
        this.weight = weight;
    };
    bark() {
        console.log(this.name + " says woof woof!");
    };
    static describe() {
        console.log("All dogs are canines");
    };
};
One really nice thing about class is that we can now group all the parts of the constructor together: the constructor function itself, the prototype methods, and even the static methods. And notice that the function keyword is nowhere to be seen anywhere in this code!!
Okay, so how do you use this to create new Dog objects?
var fido = new Dog("Fido", "Mixed", 24);
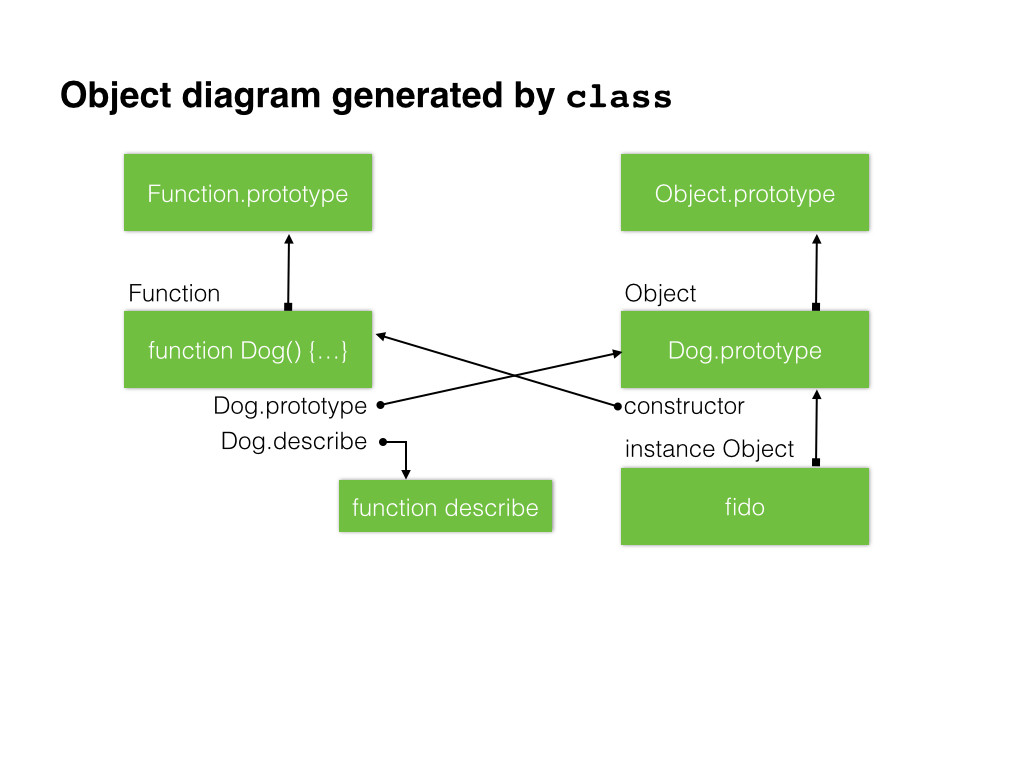
In other words, it’s exactly the same! The fido object created by this code is no different from the fido object we created with the previous code. They are exactly the same. And, if we look at the object diagram that’s created by this code, you’ll see that’s the same too:
In ES6, you’ll still be able to construct objects the “old” way. So what’s the advantage of using class instead? As I mentioned earlier, I think the syntax is a bit cleaner and easier to read and understand. But class really starts to shine when you want to do more than one level of inheritance: in other words, when you want to extend your objects further.
EXTENDING OBJECTS
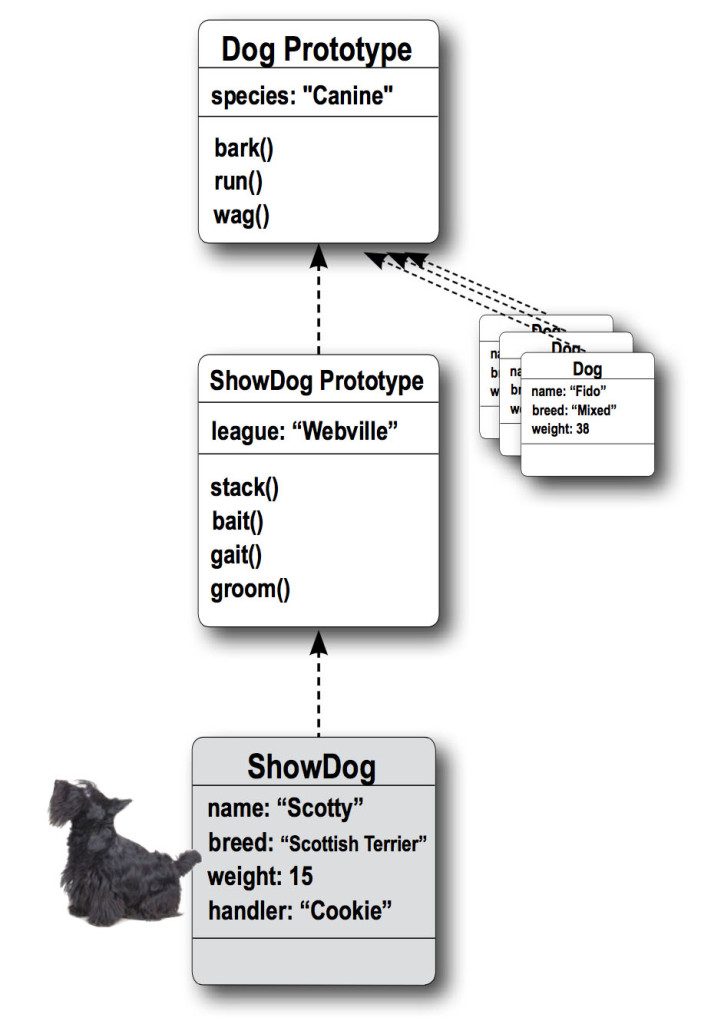
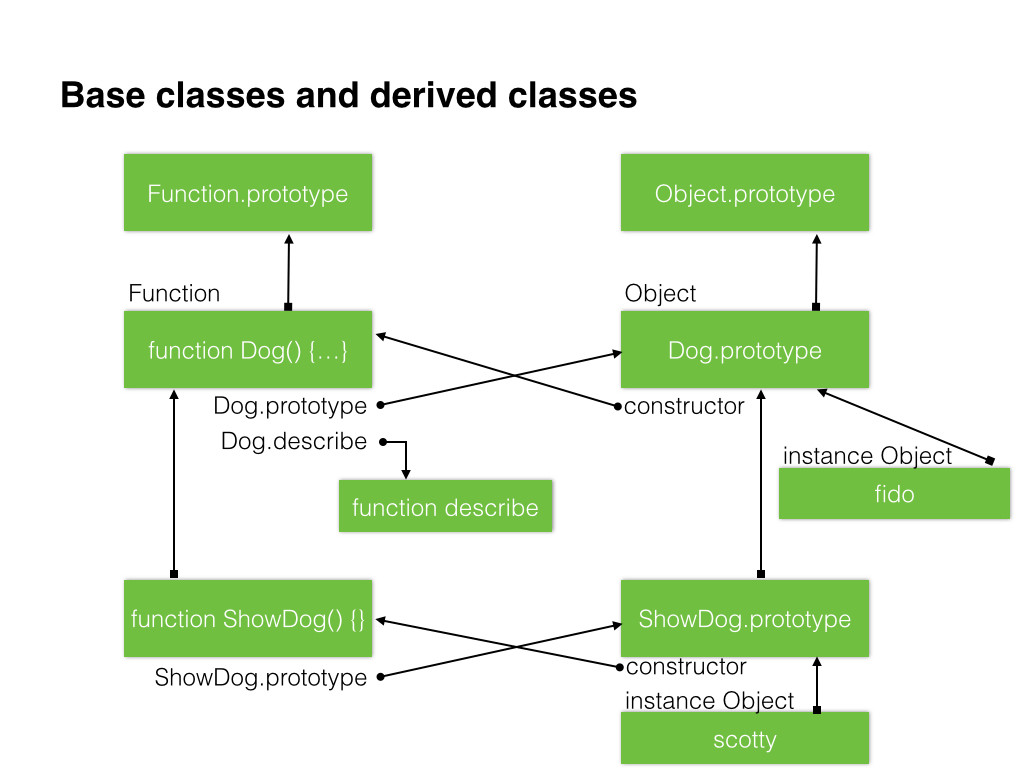
If you’ve read Head First JavaScript Programming, then you’ll remember that we extended our Dog objects with ShowDog objects. These objects inherit from both ShowDog.prototype, a Dog object (to get name, breed, and weight), and from Dog.prototype to get the bark method. Here’s what that inheritance chain, or prototype chain, looks like in the book:
And the (ES5) code looks like this:
function ShowDog(name, breed, weight, handler) {
    Dog.call(this, name, breed, weight);
    this.handler = handler;
}
ShowDog.prototype = new Dog();
ShowDog.prototype.constructor = ShowDog;

ShowDog.prototype.stack = function stack() {
    console.log(this.name + " is stacking");
};
// other prototype methods here…

var fido = new Dog("Fido", "Mixed", 24);
var scotty = new ShowDog("Scotty", "Scottish Terrier", 15, "Cookie");
scotty.bark();
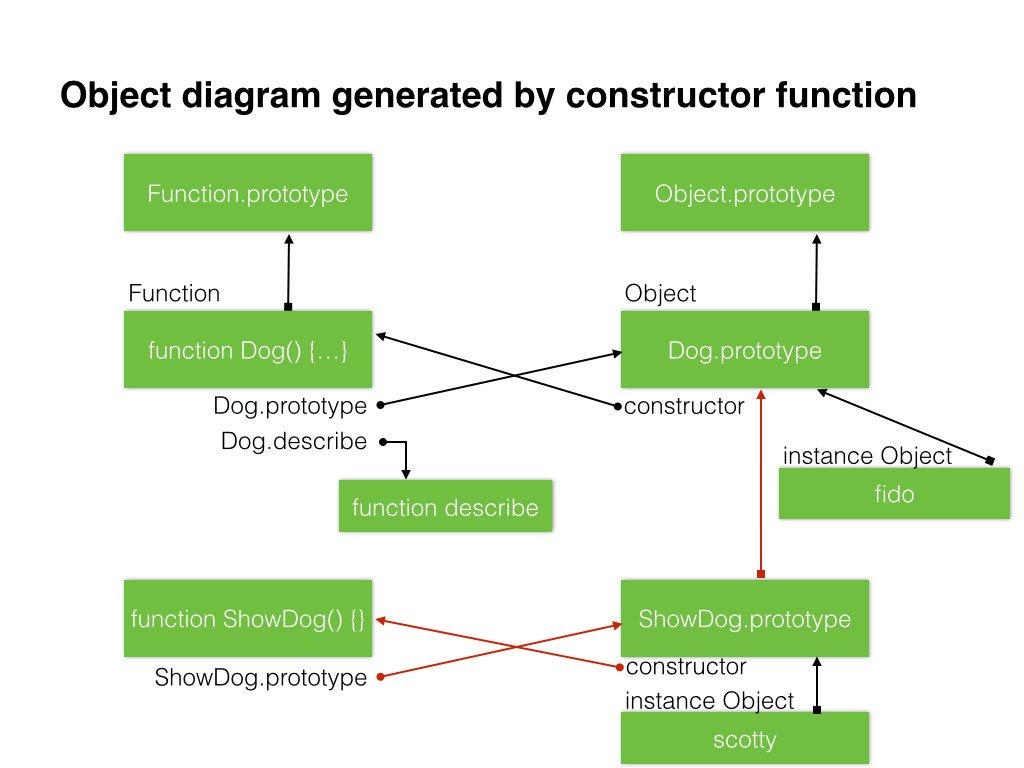
To make sure that ShowDog instances inherit the methods in Dog instances, we have to set up the prototype relationship between ShowDog and Dog manually. Likewise, we have to make sure that the ShowDog.prototype.constructor property is set correctly.
The diagram below shows the object relationships created by this code. The red lines show the relationships that we have to set up manually:
In JavaScript ES6, we’ll use class with another new keyword, extends, which takes care of all that for you:
class ShowDog extends Dog {
    constructor(name, breed, weight, handler) {
        super(name, breed, weight);
        this.handler = handler;
    };
    stack() {
        console.log(this.name + " is stacking");
    };
    // other prototype methods here…
};
The keyword extends indicates that we want ShowDog instances to inherit from Dogs. Inside the constructor, we call
super(name, breed, weight);
This takes the place of:
Dog.call(this, name, breed, weight);
in the ShowDog constructor done the old-fashioned way. super just means we’re accessing the “super class” (or super constructor) of ShowDog which is whatever object we’re extending, in this case Dog. This makes sure that name, breed, and weight are set correctly in the ShowDog.prototype object (just like before). We set the handler property in the constructor because handler is a property of ShowDogs, not Dogs.
Now, extends takes care of setting up the correct relationships between objects for us, using much more concise and clear syntax.
We create and use new ShowDog instances just like before:
var scotty = new ShowDog("Scotty", "Scottish Terrier", 15, "Cookie");
scotty.bark();
scotty.stack();
Here’s the object diagram for the code above using class and extends. Notice the red lines are gone, meaning that the relationships that we used to have to set up manually between the ShowDog.prototype and the Dog.prototype, and for the ShowDog constructor are now all black, meaning they are created for you. Also notice there’s one other arrow that wasn’t there in the previous diagram: the relationship between the ShowDog function object and the Dog function object:
This extra arrow represents a relationship that wasn’t really possible to set up before and that is, an inheritance chain between the two function objects Dog and ShowDog. What this means is ShowDog (the function object) inherits the describe method from Dog (the function object). So you can call ShowDog.describe() and it will work—it will call the describe method in Dog. Probably not a huge deal but that might come in handy!
One last quick thing to note about extends. You saw that we can access the “super class” of ShowDog, Dog by using the keyword super. We can call the constructor of Dog by calling super as a function. We can also access properties and methods in the super class. To see that, let’s add a toString prototype method to both Dog and ShowDog:
class Dog {
    constructor(name, breed, weight) {
        this.name = name;
        this.breed = breed;
        this.weight = weight;
    };
    bark() {
        console.log(this.name + " says woof woof!");
    };
    // other prototype methods here…

    toString() {
        return "DOG: " + this.name + " weighs " + this.weight + " pounds.";
    };
};
class ShowDog extends Dog {
    constructor(name, breed, weight, handler) {
        super(name, breed, weight);
        this.handler = handler;
    };
    stack() {
        console.log(this.name + " is stacking");
    };
    // other prototype methods here…

    toString() {
        return "SHOW" + super.toString();
    };
};
var scotty = new ShowDog("Scotty", "Scottish Terrier", 15, "Cookie");
scotty.toString();
In Dog, the toString method returns DOG, along with the name and weight of the Dog object.
In ShowDog, notice that we’re using super to access the toString method from Dog to create that string, and then we’re prepending the string SHOW on the front. The result is the string SHOWDOG, along with the name and weight of the ShowDog instance. If we write:
console.log(scotty.toString());
we’ll see
SHOWDOG: Scotty weighs 15 pounds.
in the console.
SUMMARY
This has been a whirlwind tour of using class to construct objects. The new syntax, along with the new keywords class, constructor, extends, super and static make constructing objects in JavaScript easier, as well as more concise and clear (and less error-prone as a result).
Let us know what you think about this new syntax. And, as I described in my first post in this series, until these features are implemented in all the major browsers, you can try them using the Traceur transpiler. Access the complete code for this example on github to see how to use Traceur with this example.
RESOURCES
- Chapters Twelve and Thirteen of Head First JavaScript Programming.
- ECMAScript 6 compatibility table.
- Mozilla’s copy of the working draft of the ECMAScript 6 specification.
- Traceur transpiler which converts ES6 code into ES5 code for some features (not all).
- If you need a refresher on how to use the browser console, read this post.

