Today, I received a question from Eva, a reader of Head First HTML5 Programming. Eva asks about how to create a clickable list of videos, so that if you click the name of a video in the menu it will play or pause.
In Chapter 8 of Head First HTML5 Programming, we show you how to create a custom video player with a choice of two videos, as well as play and pause buttons (along with various other buttons to add video effects). Here’s the custom video player you build in that chapter:
While you’ll learn everything you need to know to create a video selection menu with the behavior that Eva asks about as you build the custom video player in Chapter 8, I thought I’d also show you how you could add a plain menu of videos to the other example in Chapter 8, Webville TV. I’ve kept it plain and simple so you can easily see exactly how it works.
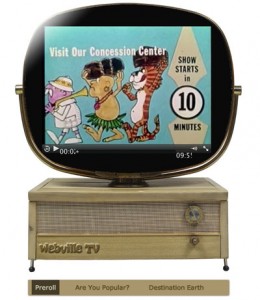
As you can see, I’ve added a simple menu bar below the TV, with the names of the three videos we used in that example. When you load the page, the Preroll video automatically loads and begins to play. I’ve left the controls in the browser video player, but you can also control playback by clicking on the name of the video. Clicking on a different video loads and plays that video. This is a very basic interface, and easy to do with the video API.
Here’s how it works. First, I updated the HTML of the Webville TV page, to add the menu of video items:
<ul id="videolist">
    <li class="selected" data-src="video/preroll">Preroll</li>
    <li data-src="video/areyoupopular">Are You Popular?</li>
    <li data-src="video/destinationearth">Destination Earth</li>
</ul>
I’ve added the class “selected” to the Preroll video so the Preroll video will be selected in the menu, and will also load and play when you load the page.
Notice that I’m also throwing in an attribute, data-src, to store the path to the video. We didn’t talk about data-src at all in Head First HTML5 Programming (primarily because it’s not ready for prime-time yet), but you can use it today just like any other attribute, even though the JavaScript API hasn’t been implemented by browsers yet. So, to access the value of the data-src attribute, simply use the getAttribute method on your element.
I also updated the CSS to style the menu a bit:
ul#videolist {
    width: 550px;
    margin: auto;
    margin-top: 20px;
    padding: 10px;
    background: #a9966d;
    box-shadow: 1px 1px 5px #463d28;
}
ul#videolist li {
    font-family: Helvectica, Verdana, sans-serif;
    display: inline;
    margin-right: 30px;
    padding: 10px;
    color: #5e4d24;
    text-shadow: 0px 0px 1px #463d28;
}
ul#videolist li.selected {
    background-color: #463d28;
    color: #d3ccb4;
}
To implement the video menu, I changed the functionality of the Webville TV JavaScript. Instead of playing the videos automatically in order like we were doing, now we want to play a video only when you click on the name of that video in the video menu. So first, we need to add click handlers to each menu item:
function addClickHandlers() {
    var liElements = document.querySelectorAll("ul#videolist li");
    for (var i = 0; i < liElements.length; i++) {
        var li = liElements[i];
        li.onclick = handleVideoSelection;
    }
}
This function uses the new querySelectorAll method to get all the <li> elements from the menu list. Then we loop through each list item and add a click handler to it.
Now, we need to implement handleVideoSelection. This is the function that gets called when you click on one of those list items.
function handleVideoSelection(e) {
    var li = e.target;
    var src = li.getAttribute("data-src");
    var isSelected = li.getAttribute("class");
    if (isSelected == "selected") {
        if (video.paused) {
            video.play();
        }
        else if (video.ended) {
            video.load();
            video.play();
        }
        else {
            video.pause();
        }
    }
    else {
        var selectedLi =
          document.querySelector("ul#videolist li.selected");
        selectedLi.setAttribute("class", "");
        li.setAttribute("class", "selected");
        video.src = src + getFormatExtension();
        video.load();
        video.play();
    }
}
Click handlers get passed an event object e. This contains information about the event, including the element that was clicked on, e.target. In this case, we know that element is a list item because we added the event handler only to the list items in the video list.
We can then use the getAttribute method to get the “data-src” and “class” attributes. The “data-src” attribute contains the path to the video to play. The “class” attribute will be set to “selected” if that video is selected, and will be empty otherwise.
If the video you just clicked on is already selected, then we check the status of the video:
- If the video is paused, then we just play it.
- If the video is ended, then we need to load it, and then play it.
- Otherwise, the video is playing, so we pause it.
If the video list item you clicked on is not selected, however, then we need to deselect the one that is selected, and select the one you clicked on. So first, we find the video that’s selected, again using the query selector API to find it (this task is much easier with this great new HTML5 API!), and deselect it simply by setting its class to empty (“”). We then select the list item you just clicked on by setting its class to selected.
Now, we can load the video player with the correct video. Remember that the path to the video is stored in the “data-src” attribute which we put in the src variable. So we just set the video.src equal to this variable, remembering to also call our helper function getFormatExtension to figure out which kind of video to load (mp4, ogg, or webm). Once we’ve set the src, we can load and play the video.
Finally, we need to update the init function so it sets up the click handlers for the video menu in the list, and loads and plays the selected video, Preroll:
var video;
window.onload = function() {
    video = document.getElementById('video');
    addClickHandlers();
    video.src = "video/preroll" + getFormatExtension();
    video.load();
    video.play();
}
Just like in the example in the book, we’re using a global variable, video to store the video element so we can access it from all the functions.
To try this example with the book code, download all the code for the book from WickedlySmart.com, or download just what you need from the book’s Chapter 8 github repo.
Let me know how it goes! And thanks to Eva for a great question.


